
Hello Crafty Ladies!!


Annu here today I am here to share with you all my new project as a "Guest Designer" for "The Element Craft Studio" of "Rakhi Mittal" didi. It is a very proud movement for me and this movement have came into my life only and only because of Rakhi didi.

Now a little about "The Element Craft Studio", they have a wonderful collection of MDF bases like every kind of boxes, trays, baskets, office table stationary stand stuff, home decor items, intricate decor pieces, wooden chipsters, embellishments, sentiments, miniatures stuff for doll houses or shadow boxes and beautiful scrapbook pattern paper, cardstock and lot more. For their whole range of products do visit their website link:-
https://www.theelementcraftstudio.com/
https://www.theelementcraftstudio.com/


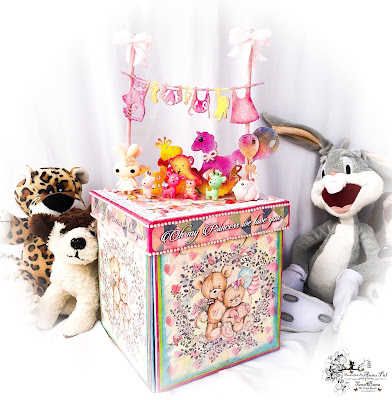
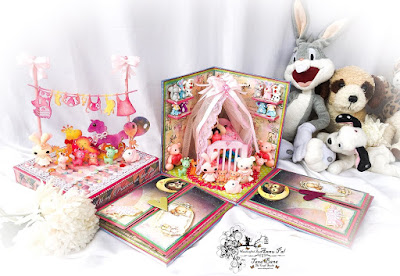
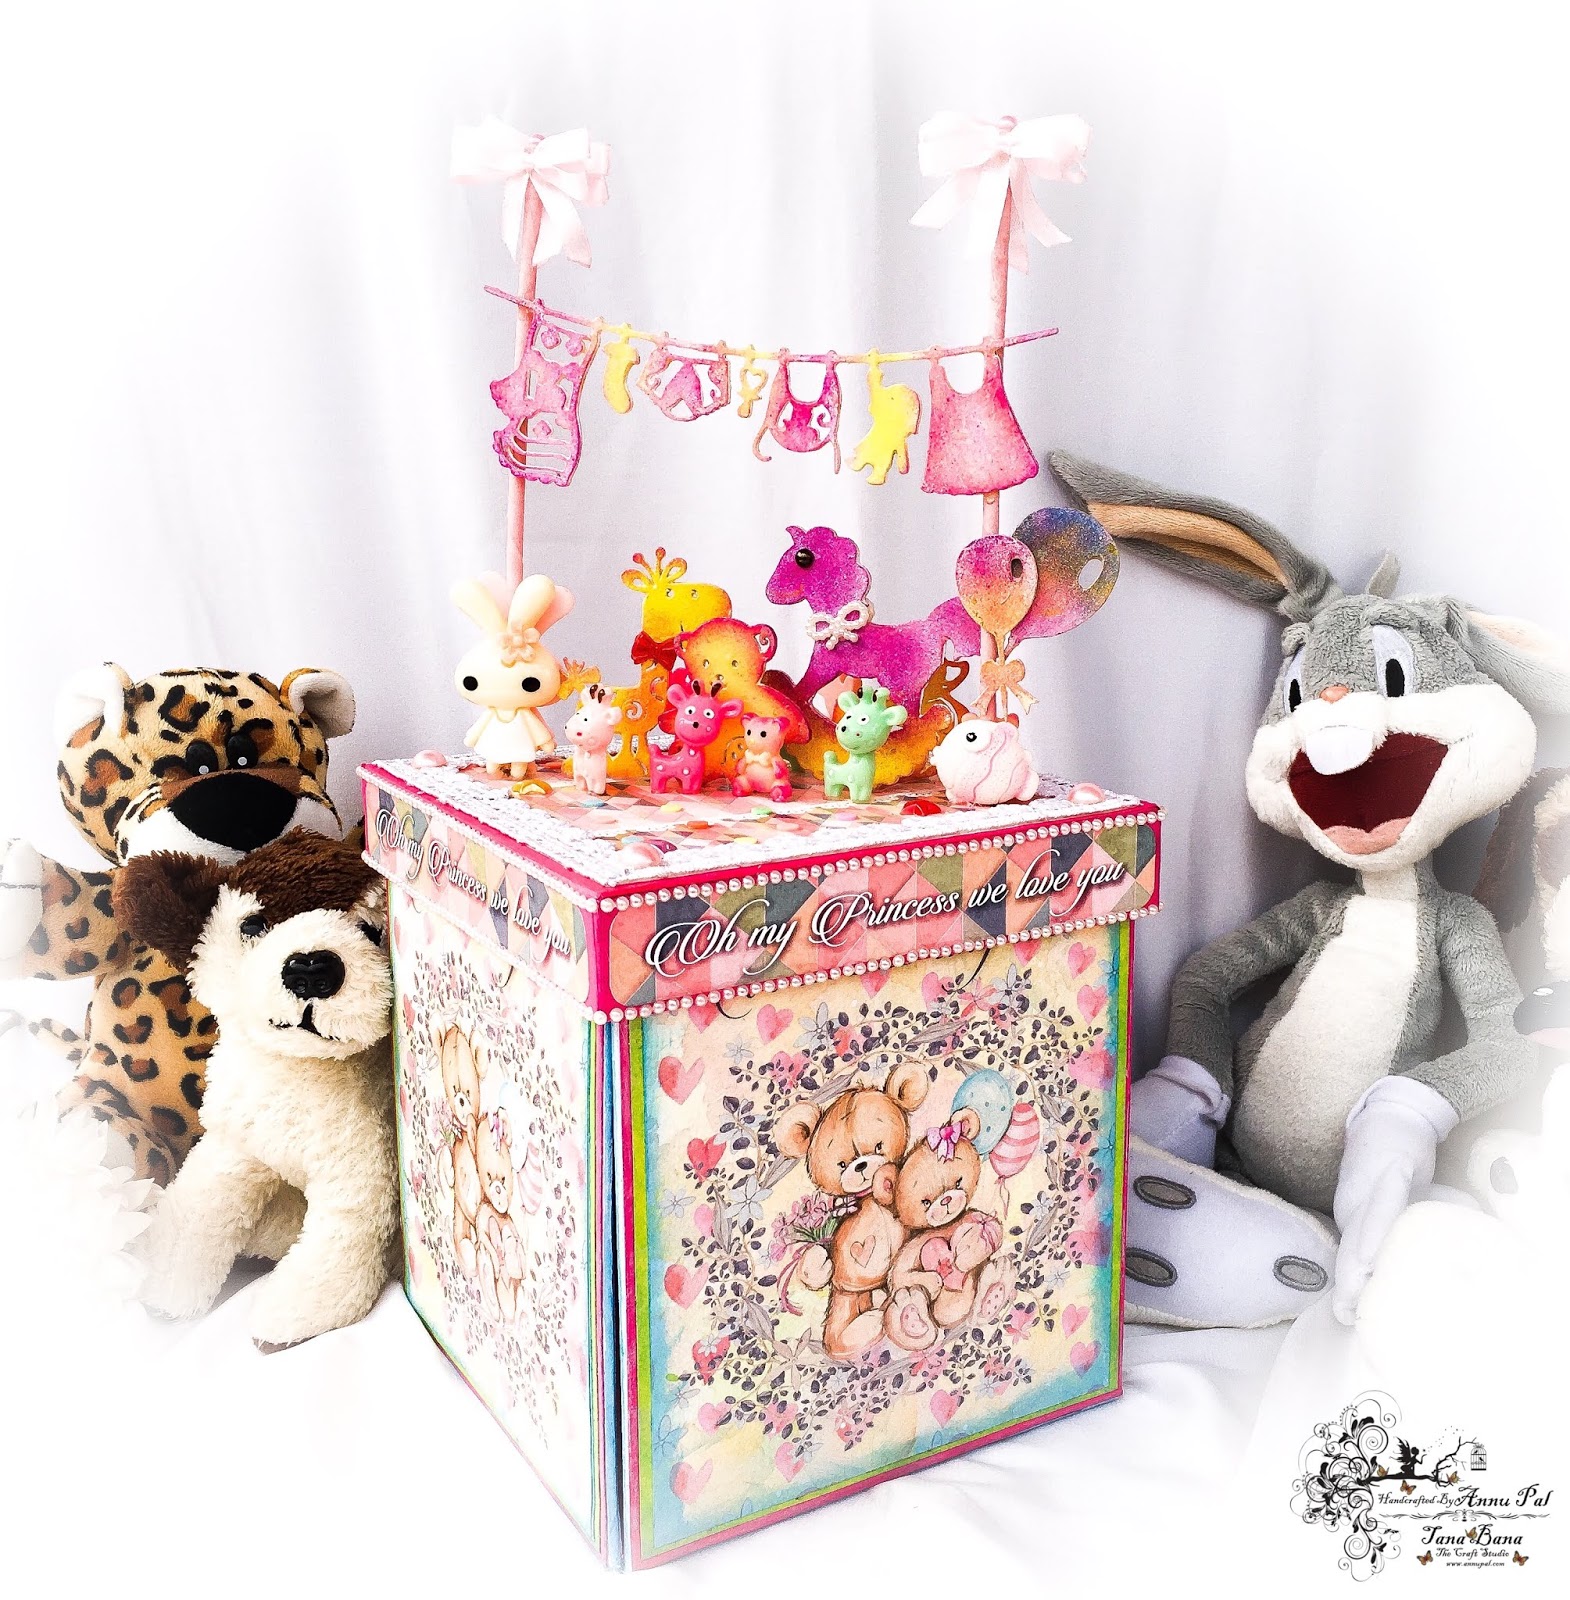
This time I have made a "3D Exploading Baby box" for my cute and adorable little niece who is about to turn 6 months old so made this box with mini waterfall albums for capturing all her beautiful memories forever. Hope you all love my new creation.
Products Used
- My Little Princess Paper Pack 12" and 6"
- My Little Princess Motif Sheet
- Wooden Miniature 3D Baby Crib
- Wooden Baby Embellishment
- Bubblegum Accessories Toys
- Baby Pink Satin Ribbon
- Baby Pink Felt Fabric
- White Net Fabric
- Delicate Pink Lace
- Small Half Pearls in Pink Shades
- Sponge
- Medium Weight Chipboard
- Double Sided Foam Tape
- Double Sided Red Tacky Tape
- Acrylic Color In White
- Pearl Acrylic Paints In Pink, Sky Blue, Green And Yellow
- Hot Glue Gun And Sticks
- Clear Drying Adhesive
- White Card-stock
- Pink Card-stock

Instructions For The Box
My 3D exploding box measures 6 1/2 inch by 6 1/2 inch with lid. For the basic structure of the box and lid i have used medium weight chipboard. For the box I cut 4 pieces of chipboard measuring 6 1/4 inch by 5 3/4 inch and 1 piece measuring 5 3/4 inch by 5 3/4 inch this will be the base of the box to which all the four sides will be attached and for the lid I cut the top measuring 6 inch by 6 inch and for the sides i cut the chipboard measuring 6 inch in length and height measure 1 inch.

Next I cut out some strips from the white cardstock measuring 1 inch and score it in half and joined all the 4 pieces with the base piece using the strips I also pasted the strips to all the edges of the 4 flap so the flaps are covered from all the sides. Next I joined the two flaps together to make the walls for the room and left two flaps open. For the lid I joined all the 4 pieces together and interconnect them with the top of the lid with the strips that i cut from the white cardstock.

Next I took the pink cardstock and cut out 8 pieces measuring 6 1/4 inch by 5 3/4 and 2 pieces measuring 5 3/4 inch by 5 3/4 inch and pasted them to all the flaps from outside to inside including the top and down side of the box base. Next i took the white cardstock and cut 8 pieces measuring 6 inch by 5 1/2 inch then i took the acrylic green shade and distress all the sides of the cut pieces and pasted it to ll the flap from inside out leaving the base as for the base i cut out i piece from the pattern paper measuring 5 1/2 by 5 1/2 inch and glued it down to the base. Next I took the desired pattern papers and cut them all measuring 5 3/4 inch by 5 1/4 inch and then distress the edges using acrylic pear sky blue shade and pasted them from inside out on the flaps as earlier.Till now the base is decorated. You can refer to the pics below for detailed view.
Instructions For The Mini Waterfall Album

Firstly I took a pink cardstock and cut it measuring 10 1/2 inch by 5 3/4 inch, Next score it at 2 1/2 inch, 2 3/4 inch, 5 inch and 5 1/4 inch now fold it from all the scored lines and u will get a gatefold shaped card piece make one more piece in the same way.Next I took my favorite pattern paper and cut out 2 pieces from one sheet measuring 2.1 inch by 5 1/4 inch for outside of the gatefold flaps and did the same for inside flaps and for the center of gatefold i cut the pattern paper measuring 5 3/4 inch by 5 inch and pasted them down and also I fussy cut the exact motifs from the motif sheet that where printed on the pattern paper that I have pasted on the front side of the gatefold flaps and then put some double sided foam tape and place them on the top of printed motif on the flap of gatefold card. Next will make the flaps for the mini waterfall album for this I cut out 6 flaps measuring 4 3/4 inch by 4 inch now from the top of 4 inch score at half inch and fold it down so your one flap is ready do this to all the flaps. Next I took 12 sheets of my favorite pattern papers as need to paste them on both sides of the flap and cut them all measuring 4 3/4 inch by 3 1/2 inch and distress all the edges with acrylic pearl yellow shade and once dried pasted them to both sides of the flap as desired. Next I cut out 12 motifs from the motif sheet and pasted them on each flap by gluing them from one side making an opening from other side to make pockets for sliding in the photographs and tags. Next comes the closing part of the gatefold flaps for that I have glued the pink satin ribbon on both the sides of the gatefold flap now simply tie a a knot and make a bow and for extra grip I have also added an magnetic heart shaped closure to it.do Repeat the same process for making the second mini waterfall album for the other flap.Refer to the pics below for more detailed view.


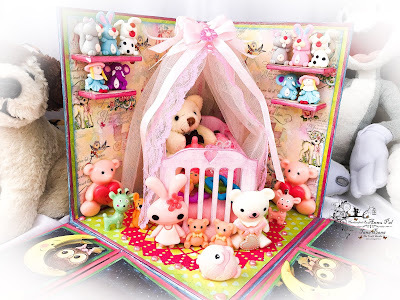
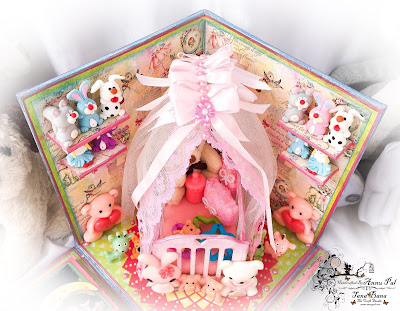
Instructions For The Center Piece And Room Decoration
Firstly I assembled my baby crib. Next I gessoed the baby crib from inside out and once its dried I sanded it to give a smooth look, then painted white n pink in shading whole of the baby crib. Now i made bedding for crib with pink felt cloth, poly-wool, pink lace and little bow embellishment. Next I have made canopy for the baby crib, decorated it with ribbons, bow, laces, net, half pearls and miniatures. Now finally placed it inside the center of the box I placed it diagonally. plz refer to the pics below for details.


Next I made shelves with chipboard for the baby room and placed some toys. Next I placed a cute little miniature teddy bear in the baby crib with miniatures.Then I put some cute little toys. Lastly I put some toys in front of the baby crib, some around the baby crib and some lying beside the walls. So finally my "Little Princess 3D Exploding Box " is ready.
Instructions For The Decoration Of Lid
Firstly I cut out 4 banners saying "Oh MY Princess We Love You" and pasted it to the four sides of the lid, pasted self adhesive strip of mini half pearls. Next I cut the pattern paper measuring 6 inch by 5 3/4 inch and pasted it on the top side of the lid,I also pasted floral lace on the side of the pattern paper on the top of the lid. For banner, I used straws by covering them with baby pink floral tape and used wooden baby cloth line embellishment and 4 small bows and glued them on each top both sides of the straw and on top of the straw I also added two small half pearls. Next I took some wooden toys embellishments and other 3d toys and glued them below the cloth line as desired and lastly added some little pearls and colorful round acrylic dots for decoration so finally the lid is ready to place on top of the box. Hope I inspire you all this time too with my creativity.
Here is the video overview of this box----
Thanks For Stopping By
Happy Crafting!!
Love And Hugs


