Showing posts with label Gift Box. Show all posts

Thursday, 6 June 2019

Moroccan Style Boxes

Hello Crafty Friends,

Semonti here again on TECS blog for share my DT inspiration post. We all need different types of storage in our everyday life. Properly organized things make our life easy.

TECS has huge range of various types’ organizer storage on their MDF range. Today I have made a beautiful small tray with two nesting box. Here is my project.


Materials used from the store:

Step by step procedure:
1. First I have applied texture paste with border stencil on four sides of the tray and let it dry. Then apply white gesso all over the tray and inside of the two boxes and the two lids. 


2. Choose two colors for inside the tray and boxes and lids(Tanned Tone and Rustic Bronze) and two colors for outside of the tray(Aqua Green and Patina)


3. Highlighted stenciling designs with Bronze paint.


4. Now decoupage two boxes. I have chosen Moroccan theme 2 different design papers for each box. Cut the papers according to box size and decoupage it with Mod Podge matte. 


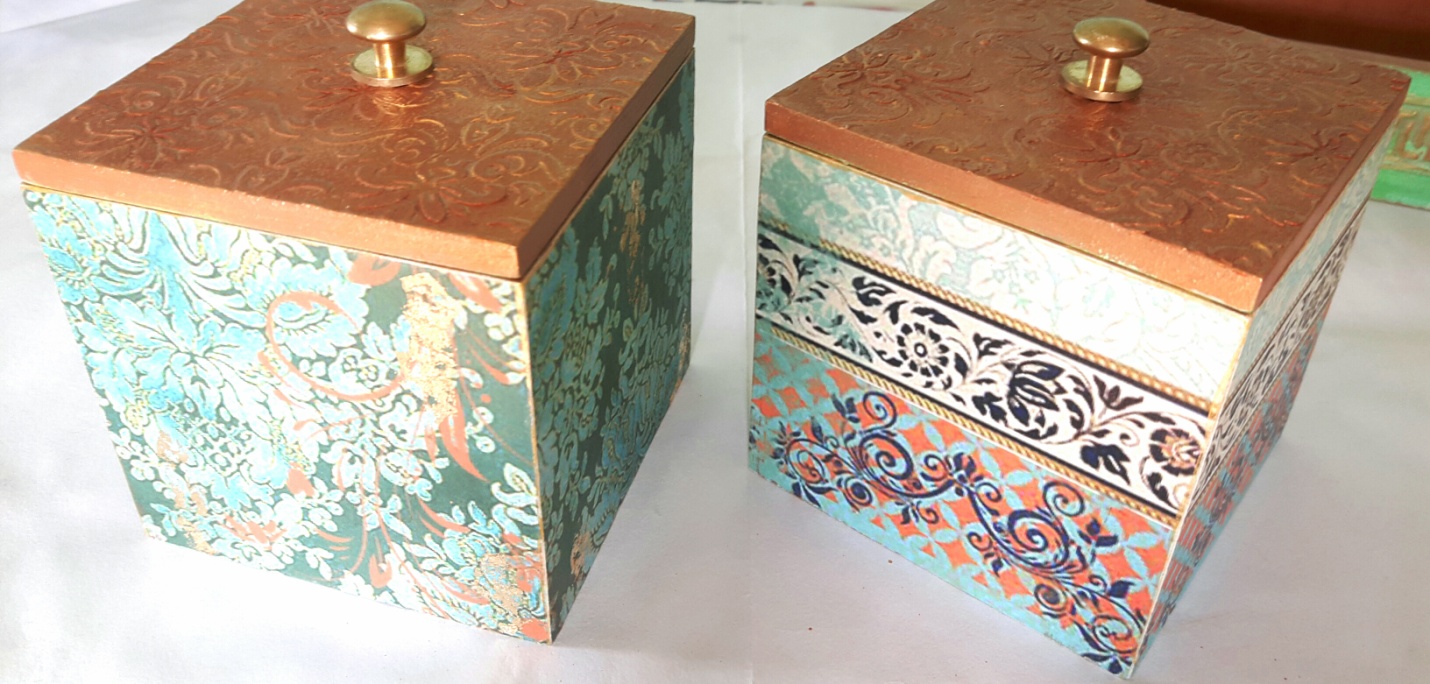
5. After dry the glue I want to create a royal look on my project. For that I use gold foil randomly on two sides of the boxes and gold wax on stenciling area of tray and edges of two boxes, lids. 


6. I want matte look on my project so use matte varnish on it.

7. Lastly add metal corner on tray. Here are some more pictures of my projects.


If you like it, please leave some love.

Love and Hugs,
Semonti


Thursday, 23 May 2019

Sunny Roses on Jar

Hello crafty folks,

I am back again at TECS blog with my other inspirational project, recently TECS launched new Jute flowers. They are just amazing with so bright and fresh colours.

I received a beautiful Acrylic front Jar as my DT kit. I love to alter jars.


The materials used from TECS :
  1. Acrylic front Jar
  1. Rustic gold Decoupage paper 
  1. Juthe flower
  1. Wooden cutouts
  1. Chalk paint
Let's start the procedure to alter a Jar.

First, I gave a coat of chalk paint ( Rustic Russet ) to the entire jar. After that, covered 3 sides of jar and lid of the jar with Decoupage papers ( Rustic Gold ). Cut the papers according to the size of the Jar and glued it with Mod Podge. Added texture with modeling paste and color .


Second Step is to gather all embellishments to decor the Jar. I used TECS

different wooden cutouts. Arrange them roughly first and after that glued them with a hot glue gun. Now I added 3D stickers for more interest. And the step is to add different types of stones to create more depth. It's almost ready now, at the last I stuck Acrylic sheet with hot glue gun in front of the Jar.


It's ready ... Hope you guys love it !!!
Have a good day ...
Thank you,Vidhi Jadeja

Thursday, 2 May 2019

Love Packed in Box

Hello guys,

I am Back on TECS, this time with a gift idea for Mother's Day. Mothers are everything to us and I am sure, none of us would like to leave a chance to make them feel special . Let's get going !


To begin with I have a beautiful carved box from TECS, all their products are super strong and smooth.

There is no need of sanding required. Using the stencil, I created some texture on the base.


Now,  once the texture paste is dry,  varnish on the texture,  so that it doesn't spread while painting above.  Now I painted the whole box with this beautiful wine red chalk paint from Anra Crafts.


Using a decoupage paper,  I pasted the inner base with these cute deer's..  Looks like a mom and daughter to me ☺ isn't this print beautiful? 


Now the top flap of the box I applied crackle medium and painted with a cream for the red cracks to show.


I took one more decoupage paper with beautiful flowers and randomly cut them to do volume decoupage.


Pasted the fussy cut flowers on to the sospeso sheet and fussy cut and embossed them to make a beautiful floral arrangement for the top of the box.


Added some pollen and pink glitter to add some interest.


Finished the arrangement by adding a sentiment "Memories" In the center.


So,  this is how the box looked once done. 


Now,  to make it look more vintage,  I added these metal legs from the Anra Crafts metal embellishment collection.


I totally love the outcome,  and hope my mom would love this too ðŸ™‚


I hope you like this project.  Please let me know your thoughts in the comments below.  Thank you for stopping by! 
Until next time..  ❤
Here is the List of all the products used in this project
Trellis Cut work lid box
Deer charm Decoupage paper
Border Fleur decoupage paper
Soft Skin chalk paint
Wine red chalk paint
Zigzag magic
Pink glitter
Metal legs

Tuesday, 2 April 2019

Mini Theatre

Hi Crafty Pals..

This is Sheetal ,Creative Designer at The Element Craft Studio.Today I am here to Share a Mini Theater Shadow box card with you all.

Here I share the Glimpse of the Project.


This project is full of chipsters basically in a beautiful Garden theme. I used lot of leaves clusters cutout and tried to give it a fresh look of greenery.


List of Materials used

Flowers from my stash

Step 1: I took 12 by 12 inches white card stock and trimmed it to the size of 7 by 12 inches. 


Step 2: Next I scored the lines as given just to make a proper folding of the card.


Step 3: Next I have used a border punch to punch the upper border and inked the edges.


Step 4: I took 2 strips to attach in the inner side of the folded Shadow box, placing one backward and the other at the front as shown in the picture.I layers all the cuttings with the beary love paper pack...


Step 5: Finally I placed the Garden bench,leaves, Dancing couple,stars,branches after coloring them.I applied white glimmer dust on the cupid cutout and the stars as well and embellished the shadow card with stone lace..And this is how it looks :)


Wednesday, 13 March 2019

Le Conte--An Old Book

Hi all crafty lovers,

 I am Anika Mittal. Thanks to TECS to give me this great opportunity to showcase my work as a DT. All the TECS products are great and they always inspire me to create something new. Today I am presenting my new creation ‘MIXED MEDIA VINTAGE BOOK BOX’ in which I have used clay in a different way.

When I received book box as my project kit the first thought came in my mind was lets go vintage and I decided to give my project an old book look.  Lets start our vintage journey with the list of material that we need to make it successful.
TECS book box base   
Vintage world 1 decoupage paper 
Roman dial stencil   
Vintage border stencil 
Chalk paints  
Mod Podge 
Metal charms 
Texture paste ,Gloss gel
Clay

First, we remove both the hinges from the book box base. It helps us to color our sides of the flap properly and to keep the hinges clean. After that I covered my front flap with the vintage decoupage paper and add some design of clock by using texture paste and dial stencil. I wanted to give my project some rough look that’s why I used knife to spread gloss gel roughly.

Next , I spread the texture paint on the sides of the base and used a fork to give old pages effect. After drying the gloss gel , now its time to try my new technique. 

I took a thin layer of clay and place it in the middle of the front flap with giving some creases to give it embossed effect and give some texture with stamps and added some metal gears.

Put this aside for drying. In the mean time, lets focus on our side and inner parts designs. I have used TECS stencils for inside and side designing.


To give pages vintage effect, I have used brown ans burnt sienna oil paints. I spread the burnt sienna and raw sienna oil paints on the sides and then wiped them with wet tissue . then added some dark brown color on the sides.

I colored the front with shading of metallic and chalk paints and then colored the sides and inner part with green chalk paint. I applied wax on the side and crackle medium inside flap of the book cover .After drying the crackle medium, I gave the brown color top coat and add some golden color effects in the middle part of the dial and in the sides.
On the side , I rubbed the wax and applied brown color top coat. After drying the brown color, I used the sand paper to add the distress look. And gave my book box time travel title with the help of clear stamps and embossing powder.

I did stick wing key with glue gun in the middle of the front flap. Now gits time to give some finishing touches. I used some gold and brown paint to give final touches of my project. 

Hope, you all will like my blog. If you have any questions about the project, please feel free to ask me in the comments. Thank you for reading my tutorial.