Showing posts with label bookmark. Show all posts

Monday, 8 April 2019

Reading with Roses --- Shabby Bookmarks

Hello Craft People 🙂

Manasa Priya here with a quick DIY inspiration for this month's blog challenge at TECH - anything goes shabby chic using atleast one element from the Element Craft Studio.


So, as you all know I love shabby Chic style and using distressing with flowers and the likes.


That has what has inspired me to create these quick bookmarks.


Do I have taken the MDF bookmarks from the store and decoupage them with the fairyland scrapbook paper. It is full of beautiful quotes, sonnets, little fairies and I really love the prints. And it's got beautiful coordinating element sheet as well.. Which we can fussy cut.


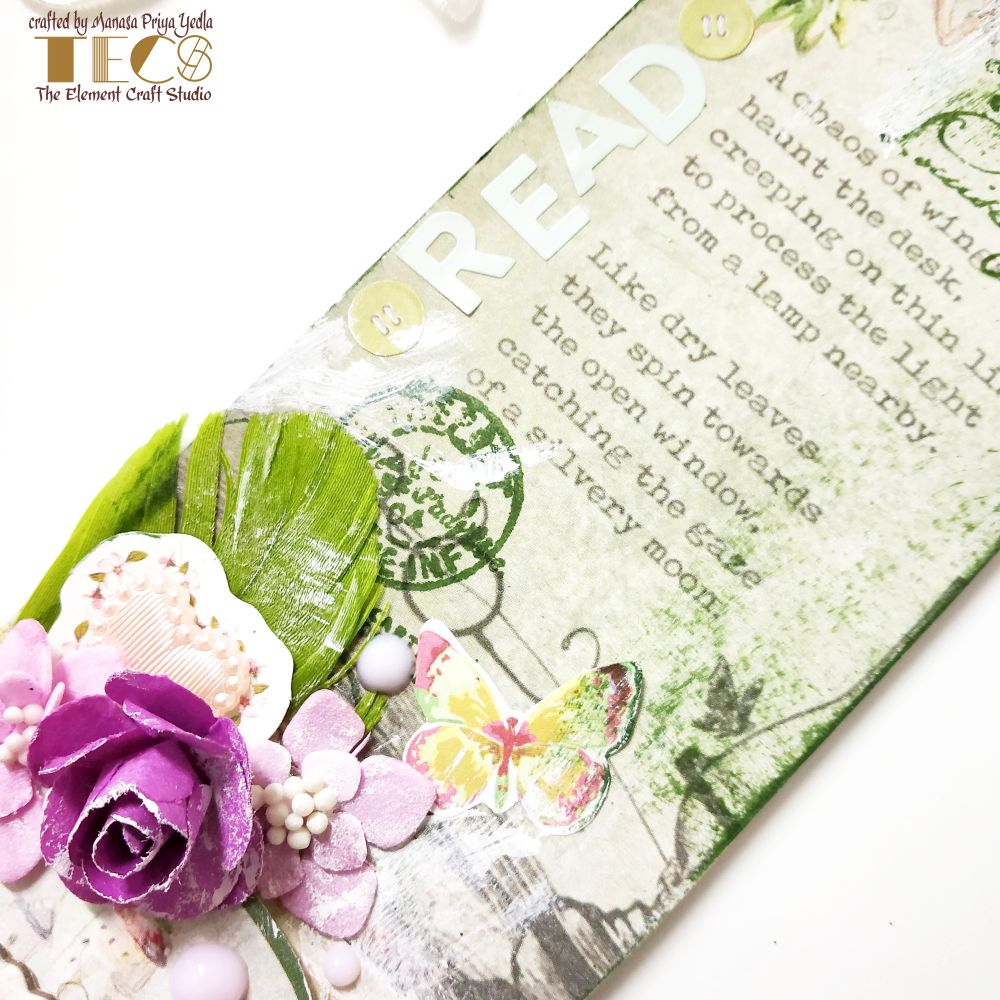
Then I added washi tapes in the empty spaces and distressed the edges and stamped randomly to make the background a little busy. 


 And I assembled all the elements using some foam tape to give it a dimension. Now comes the star of the show, the beautiful flowers.. These are the newly launched paper flowers from RECS. Look at those pretty colors 😍 these are super cute and goes well with any projects


I finally finished it off by adding some embellishments and stickers and ties laces over the top. 


I hope you enjoyed looking into this project ☺ please do participate in the monthly challenge to win some amazing prizes. 

Until next time.. ❤

Here is the list of all products used in this project---


Saturday, 3 February 2018

Love Tags

Hello friends,Jinal here

I am very happy to show you all my new project(love tags) for TECS....hope you all will like the creation. I made this using major material from TECS....

So lets start with the projects.... Firstly a picture of final tags


Material used :
Love is Everywhere papers 
Wooden tags
Fabric laces,paper border
Wooden embellishments 
Flowers...ribbons 
Clear gesso,embossing powder,versa mark.
Distress inks.
Glossy assent
Stencils.
Fevicol ,foam tape and marker

Procedure :

First select the paper of your choice. Mark the size of tag on the paper n cut accordingly. Stick it and then do distressing and stenciling with distress ink and clear Gesso..as shown in the picture... do the fussy cutting of the elements u want to highlight..distress the fussy cut  article...and highlight with glossy assent.


Stick the laces and border according to your wish...than assemble all the wooden chippis which you kept ready doing heat embossing.,...place it according to your choice...put foam tape on back of the fussy cut article and die cuts...and stick it with glue gun to give Three dimensional effect....your tags are almost ready just highlight with the markers if needed

Hope you like the tags I made.... would wait for your valuable comments and feed back....attaching close up pics...


Hugs!!
Jinal


Sunday, 28 January 2018

A Bookmark of Love

      Hello dear Folks...Sheetal here,

     Today I am on the blog with my a beautiful post. Previously there have been many blog post showcasing the amazing paper packs recently launched by TECS. Today I am going to share the very first project I made using these lovely papers.. First of all have a glimpse of the project.


Materials  used:

Mdf bookmark base by TECS
Papers by TECS
Mdf sentiment  LOVE and cut out by TECS
Distress ink for colouring edges
Gesso
Mulberry roses from my stash
Glue for pasting
Sparkling dust

Step 1: I took the mdf bookmark


Step 2 : After that,I applied gesso on the edges
           

Step 3 : Then I grabbed this lovely paper pack named" Love is everywhere" and used one paper for base and cut out heart shape from the green paper and a smaller heart for embellishing. I have fussy cut out the scooter from the paper.
                       

Step 4: I inked the edges of the tag shaped cut out using the distress ink crushed olive shade and pasted on the Mdf base.
                     

Step 5 : I assembled all the embellishments  and used the love cut out  and applied sparkling  dust.Sharing few more pics from different angles.


   And this is how it looked after its done..

                   Hope you liked it...Thank you!!

                  Sheetal Thakore