Showing posts with label Album. Show all posts

Thursday, 6 June 2019

A Family Tale--A Family Album

Hello everyone one puja scrapbooking here., today i am here to share my first  DT project by THE ELEMENT CRAFT STUDIO.


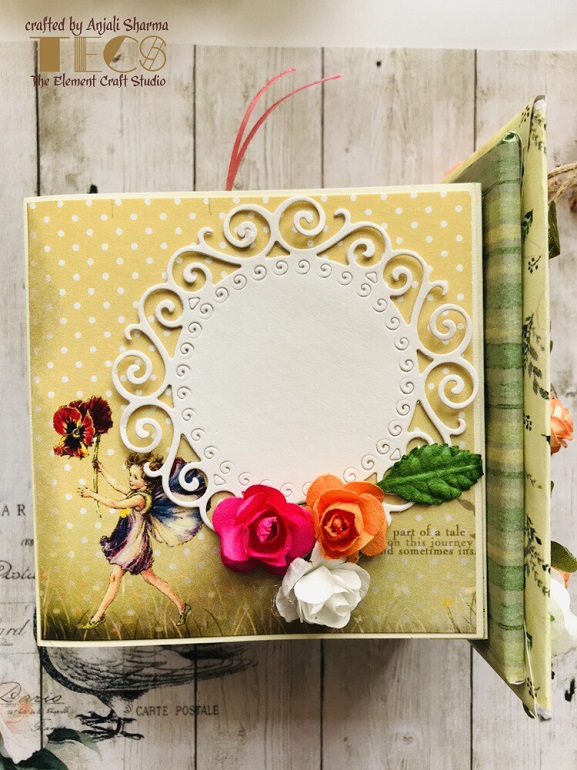
          So today am sharing the wonderful collection of beautiful paper pad "A FAMILY TALE"    THE HUT ALBUM... This paper-pack has  shown beautiful moments  between family. So then i thought to give it a shape of hut album. This album has 4 pages  with 8 sides. The very first pages  is about the  unconditional love sharing between the "FATHER AND THE DAUGHTER".  that is priceless the beautiful never ending love... I have made pockets and envelopes to store the pictures of father and daughter  and also decorated with Embellishments and laces.


 The side page is about Sisters and their eternal bonding....


The second page is about "MOM" in which the little girl share good time with her mom  this part i have decorated with flowers and die-cuts and many flip - flops.


The third page is about her " BROTHER" no less than a best friend... With whom she is sharing all giggles and smile.. I have created waterfall and  open flips  with die-cuts and flowers.


And the forth page is about
" THE FAMILY PICTURE"  where one can post  more memories there.


 The outer  parts of hut album is MDF  parts which made me easy to give it a shape  with proper finishing.

The album with mdf base is long lasting and worth to buy.

Thank you soooo much TECS for giving such bful products the makes easy for every crafters and also give them a proper look. There is soooo much to learn from you.


Now a little about "The Element Craft Studio", they have a wonderful collection of MDF bases like every kind of boxes, trays, baskets, office table stationary stand stuff, home decor items, intricate decor pieces, wooden chipsters, embellishments, sentiments, miniatures stuff for doll houses or shadow boxes and beautiful scrapbook pattern paper, card stock and lot more. For their whole range of products do visit their website link:-

https://www.theelementcraftstudio.com/

Material Used from TECS---

Base of Album
A Family Tale Paper Pack
Die Cuts
Flowers
Miniature chair table
Wooden embellishments
Card-Stock


Happy crafting.

Wednesday, 29 May 2019

Bottled Memories---Baby Album

Hi All,

This is Rimjhim from The Element Craft Studio. Today I am here with my another project : Baby Album

Here is a glimpse of my Project.


Material used:

Dollies
Embellishments

Step 1: It's amazing to work on this newly launched baby album. Firstly, I primed the surface with a coat of gesso.


Step 2: Then I applied blue chalk paint to cover my base. After applying the chalk paint, I decoupage "My Naughty Prince" paper pack. The paper pack is just amazing. I am sure you will fall in love with it as I did.


Step 3: After that I started arranging the embellishments, wooden frames, chipboards, flowers according to my plan. 


Step 4: I also used shimmer glitter and stones for decoration.


Tadaaaaa... my baby album is ready.. This album is dedicated to my nephew who just came into our life two months back..


I hope you enjoyed my post. Looking forward for your comments and feedback.

Cheers,
Rimjhim

Thursday, 25 April 2019

Fleur Fairy Album

Hi Crafty folks,

This is Anjali,
Creative designer @The Element Craft Studio and today am here with a cute little top box mini album I did using the beautiful fleur fairy papers.


Here are few close ups of the album-


I love all the elements of the paper pack.
I embellished  the album using the element sheet of the paper pack, some mdf frame, mulberry flowers, this beautiful leaf jute twine, metal legs and knob.
I love how this turned out.


Materials used-

- Fleur fairy paper pack
- Fleur fairy element sheet
- leaf jute twine
- mulberry roses
- metal legs
- metal knob 
- white and yellow card-stock for the base 


 Apart from these I used some leaf die cuts, some chipboard to finish the look of the album.

Not to forget I assembled the album using red 12mm tacky tape from the store and for the embellishments I used 3D foam tape, charms and sequins.

I hope you liked the project.
Do participate in the ongoing challenge to win amazing goodies.
Share your valuable feedback in the comments section.
Thanks for passing by!!!

Regards


Friday, 1 March 2019

My Mom's Treasure--Recipe Book

Hi Crafty folks,

This is Anjali Sharma, designer@ the element craft studio and today I am here with a very interesting project “My Mom's Treasure--Recipe book”. I always follow my mom's recipes whenever I cook her signature dishes and always need to reconfirm the ingredients and process....


So here is an outstanding idea developed by TECS for all Mom's girls to keep recipe treasure with us whenever, wherever we want---A Recipe book with revolving stand.....Here is my version of this recipe book---


Products used from the store:
-Grass Field Glimmer dust


Here are quick steps to make the album-
- firstly I have colored the base stand with chalk paints( you can use desired color) and stenciled glimmer dust by mixing it with clear gel texture paste.


-Now I prepared album blanks by adding patterned papers on both sides of each mdf page of the album.
-I have added recipe notes on each page of album which is already in the pack.


-on pages, I have added elements like envelope using papers from the same pack, recipe tags from the small 6x6 papers pack, fussy cut embellishments given in paper packs.


- I have embellished the album with fussy cut elements from the paper pack and mdf embellishments which is available in matching theme from the store.


-for the cover I have layered cut out from the paper pack and embellished with some flowers, laces, mdf embellishments and leaf die cut outs and we are done!!!


Hope you guys liked the project!!
Do share your feedback and reviews.


Regards
Anjali Sharma

Wednesday, 27 February 2019

Little Princess Explosion box

Hello Crafty Ladies!!

Annu here today I am here to share with you all my new project as a "Guest Designer" for "The Element Craft Studio" of "Rakhi Mittal" didi. It is a very proud movement for me and this movement have came into my life only and only because of Rakhi didi. 


          Now a little about "The Element Craft Studio", they have a wonderful collection of MDF bases like every kind of boxes, trays, baskets, office table stationary stand stuff, home decor items, intricate decor pieces, wooden chipsters, embellishments, sentiments, miniatures stuff for doll houses or shadow boxes and beautiful scrapbook pattern paper, cardstock and lot more. For their whole range of products do visit their website link:-
https://www.theelementcraftstudio.com/


          This time I have made a "3D Exploading Baby box" for my cute and adorable little niece who is about to turn 6 months old so made this box with mini waterfall albums for capturing all her beautiful memories forever. Hope you all love my new creation.

Products Used


Instructions For The Box

My 3D exploding box measures 6 1/2 inch by 6 1/2 inch with lid. For the basic structure of the box and lid i have used medium weight chipboard. For the box I cut 4 pieces of chipboard measuring 6 1/4 inch by 5 3/4 inch and 1 piece measuring 5 3/4 inch by 5 3/4 inch this will be the base of the box to which all the four sides will be attached and for the lid I cut the top measuring 6 inch by 6  inch and for the sides i cut the chipboard measuring 6 inch in length and height measure 1 inch.


      Next I cut out some strips from the white cardstock measuring 1 inch and score it in half and joined all the 4 pieces with the base piece using the strips I also pasted the strips to all the edges of the 4 flap so the flaps are covered from all the sides. Next I joined the two flaps together  to make the walls for the room and left two flaps open. For the lid I joined all the 4 pieces together and interconnect them with the top of the lid with the strips that i cut from the white cardstock.

       Next I took the pink cardstock and cut out 8 pieces measuring 6 1/4 inch by 5 3/4 and 2 pieces measuring 5 3/4 inch by 5 3/4 inch and pasted them to all the flaps from outside to inside including the top and down side of the box base. Next i took the white cardstock and cut 8 pieces measuring 6 inch by 5 1/2 inch then i took the acrylic green shade and distress all the sides of the cut pieces and pasted it to ll the flap from inside out leaving the base as for the base i cut out i piece from the pattern paper measuring 5 1/2 by 5 1/2 inch and glued it down to the base. Next I took the desired pattern papers and cut them all measuring 5 3/4 inch by 5 1/4 inch  and then distress the edges using acrylic pear sky blue shade and pasted them from inside out on the flaps as earlier.Till now the base is decorated. You can refer to the pics below for detailed view.


Instructions For The Mini Waterfall Album

Firstly I took a pink cardstock and cut it measuring 10 1/2 inch by 5 3/4 inch, Next score it at 2 1/2 inch, 2 3/4 inch, 5 inch and 5 1/4 inch now fold it from all the scored lines and u will get a gatefold shaped card piece make one more piece in the same way.Next I took my favorite pattern paper and cut out 2 pieces from one sheet measuring 2.1 inch by 5 1/4 inch for outside of the gatefold flaps and did the same for inside flaps and for the center of gatefold i cut the pattern paper measuring 5 3/4 inch by 5 inch and pasted them down and also I fussy cut the exact  motifs from the motif sheet that where printed on the pattern paper that I have pasted on the front side of the gatefold flaps and then put some double sided foam tape and place them on the top of printed motif on the flap of gatefold card. Next will make the flaps for the mini waterfall album for this I cut out 6 flaps measuring 4 3/4 inch by 4 inch now from the top of 4 inch score at half inch and fold it down so your one flap is ready do this to all the flaps. Next I took 12 sheets of  my favorite pattern papers as need to paste them on both sides of the flap  and cut them all measuring 4 3/4 inch by 3 1/2 inch and distress all the edges with acrylic pearl yellow shade and once dried pasted them to both sides of the flap as desired. Next I cut out 12 motifs from the motif sheet and pasted them on each flap by gluing them from one side making an opening from other side to make pockets for sliding in the photographs and tags. Next comes the closing part of the gatefold flaps for that I have glued the pink satin ribbon on both the sides of the gatefold flap now simply tie a a knot and make a bow and for extra grip I have also added an magnetic heart shaped closure to it.do Repeat the same process for making the second mini waterfall album for the other flap.Refer to the pics below for more detailed view.


Instructions For The Center Piece And Room Decoration

Firstly I assembled my baby crib. Next I gessoed the baby crib from inside out and once its dried I sanded it to give a smooth look, then painted white n pink in shading whole of the baby crib. Now i made bedding for crib with pink felt cloth, poly-wool, pink lace and little bow embellishment. Next I have made canopy for the baby crib, decorated it with ribbons, bow, laces, net, half pearls and miniatures. Now finally placed it inside the center of the box I placed it diagonally. plz refer to the pics below for details.


        Next I made shelves with chipboard for the baby room and placed some toys. Next I placed a cute little miniature teddy bear in the baby crib with miniatures.Then I put some cute little toys. Lastly I put some toys in front of the baby crib, some around the baby crib and some lying beside the walls. So finally my "Little Princess 3D Exploding Box " is ready. 

Instructions For The Decoration Of Lid

Firstly I cut out 4 banners saying "Oh MY Princess We Love You" and pasted it to the four sides of the lid, pasted self adhesive strip of mini half pearls. Next I cut the pattern paper measuring 6 inch by 5 3/4 inch and pasted it on the top side of the lid,I also pasted floral lace on the side of the pattern paper on the top of the lid. For banner, I used straws by covering them with baby pink floral tape and used wooden baby cloth line embellishment and 4 small bows and glued them on each top both sides of the straw and on top of the straw I also added two small half pearls. Next I took some wooden toys embellishments and other 3d toys and glued them below the cloth line as desired and lastly added some little pearls and colorful round acrylic dots for decoration so finally the lid is ready to place on top of the box. Hope I inspire you all this time too with my creativity. 

Here is the video overview of this box----


Thanks For Stopping By

Happy Crafting!!

Love And Hugs